Introduction
When scraping business leads by using QLeadsGen lead generation software, you might get multiple duplicate rows for same email contact. That's because QLeadsGen software is scraping contacts from multiple sources, such as response from artificial intelligence search engine, as well as multiple web pages. This results in multiple records for same email contact.
In this exercise we are going to show how you can easily deduplicate such leads list, by unique emails, while preserving all other data for duplicate rows, concatenating values in other columns by using " | " symbol as value delimiter.
For such deduplication you can use free data matching software called "QDeFuZZiner Lite". It is free for datasets containing up to ten thousand rows.
For this exercise, we will sort our business leads list by email column. It contains 184 rows.
Download QDeFuZZiner Lite
You can download QDeFuZZiner Lite executable from: https://matasoft.hr/qtrendcontrol/index.php/qdefuzziner-fuzzy-data-matching-software/qdefuzziner-get-software
The exe file can run on both Windows and Linux operating system (via Wine), as a portable application.
Import Leads Dataset
First step is to define a QDeFuZZiner project.
Now, we need to import leads list dataset, as a csv file, as both "left" and "right" dataset. So, we need to export Excel file as csv file. You can export xlsx into csv file in any spreadsheet software, but I recommend you to use LibreOffice Calc software, which has great exporting dialog.
But, before exporting dataset to csv format, we need to add a new column, which we will call "ID" and which will contain row number. We will need this column to uniquely identify each row in deduplication process.
After we added "ID" column, now we can save the dataset and export it into csv format.
Now we have our dataset in csv format, ready to be imported.
In QDeFuZZiner Lite, go to "Data Import" tab and register the dataset as both left and right input dataset.
Now we can import the data, by clicking on "Input both input files to server" button.
Define Deduplication Project
Move to "Data Matching / Deduplication" tab and register new Solution.
In main page, leave all parameters with default value, except "Deduplication (instead of Matching" parameter, which must be switched-on.
Now move to "Solution Fields Picker" sub-tab.
Position cursor on both datasets to "ID" record. Use button "Add Fields Pair to Exact Match Relations Section", to add "ID" columns from "left" and "right" dataset into exact matching constraints definition.
Position cursor on both datasets to "Email" record. Use button "Add Fields Pair to Exact Match Relations Section", to add "ID" columns from "left" and "right" dataset into exact matching constraints definition.
Now go to "Solutions Constraints" sub-tab, under "Exact Match Relations" sub-tab. You will notice two records of exact matching constraints.
In order to perform deduplication correctly, we need to change deafult exact relation type parameter from "=" to "<>", for "ID" field.
Our data matching definition is now finished.
Now we need to enter definition of "merged columns" in order to define how duplicate records will be treated during the deduplication process.
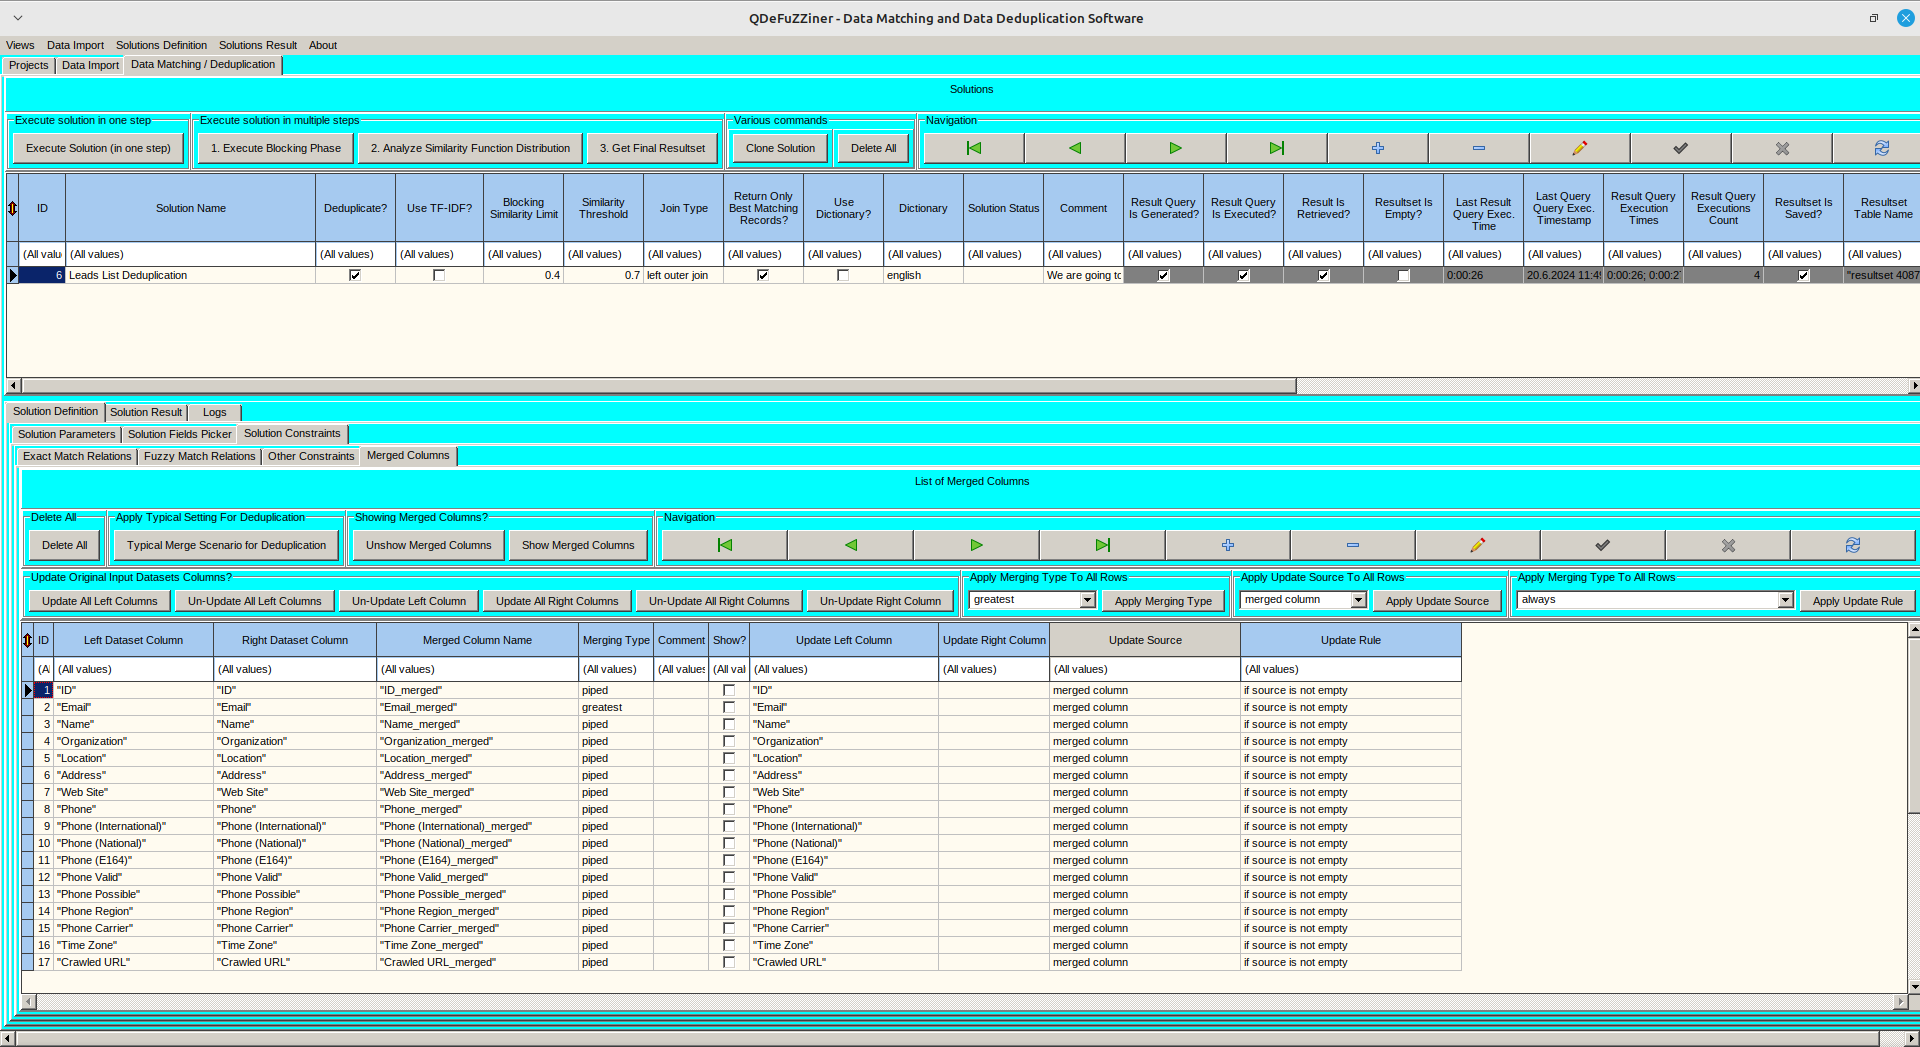
Go to "Merged Columns" sub-tab and use button "Apply Typical Setting For Deduplication", to insert default definition automatically.
This will create default definition.
Since we want to preserve all original values in other columns than Email column, we need to change merging type from "greatest" to "piped". We can use "Apply Merging Type" button to update all rows in definition, at once.
However, after that, we need to manually change merging type to "greatest" for Email column only. This will give us final definition.
Definition is now completed and ready for execution. Dataset will be deduplicated by "Email"
Execute Deduplication
Use "Execute Solution (in one step)" button to perform deduplication process.
We can now use "Load in Ext. Spreadsheet Editor" button to get deduplicated dataset in Excel format.
Our business contacts list is now deduplicated and contains only unique emails, while all other data from duplicate rows is preserved in columns, different values concatenated by " | " delimiter.
Conslusion
Business contact list retrieved by QLeadsGen lead generation software can contain multiple rows for same email contact. It is due to QLeadsGen scraping contacts from multiple sources.
However, it is very simple to perform deduplication by using free QDeFuZZiner Lite software.
Best of all, once defined and saved, deduplication project can be reused for fresh lead lists. All you need to do is to reimport new fresh datasets. Of course, don't forget to add "ID" column into dataset first.
Further Reading
About QLeadsGen lead generation software
About QDeFuZZiner data matching software


